Ableton Live 9 review
 We take Ableton’s long-awaited update to their ever-popular Live software for a spin, and find out what it has to offer.
Ableton Live’s credentials as a stable platform for clip based music production are well founded; with a hawkeye focus on quick and an efficient workflow that seems to have captured the imagination of DJs and musicians alike, each upgrade has steadily improved upon the software’s stability and functionality. It remains one of the few music production software packages that allow you to improvise complete productions as you work, and although Live’s unique position hasn’t yet been surpassed, it’s been four years since Live 8; in that time both Native Instruments’ Maschine and the recent MPC Renaissance have taken a leaf out of Ableton’s book when designing their own software, meaning more eyes than ever before are on this long awaited update.
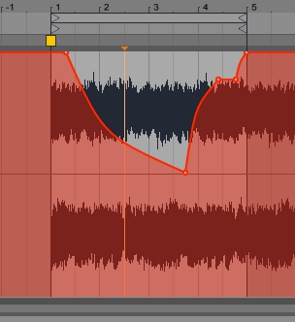
 One of the most requested changes in Live is the automation of parameters within a MIDI part or piece of audio on the clip level, rather than just the arrangement view. It’s something that Ableton have finally provided, meaning the user can now choose what parameter they want to automate within the clip’s device and control chooser that lives on the bottom left hand of the session screen. If you’re not sure of the name of the parameter you want to automate, then simply clicking on the desired control will bring up the corresponding parameter for editing in the clip window. The envelope editor itself has also seen improvement. New break points are created by a single click and by hovering on or near the last break point you can create your new parameter change. It still takes a little bit of getting used to meaning it’s quite easy to grab and hold all the parameters by accident – although this in itself is not an unwelcome capability if you want to bring an automated volume down quickly. Also new, and much requested, is the possibility of creating concave and convex envelope curves, further enhancing more detailed control of automation, while it’s also now possible to move automated clips freely between session and arrange view.

Another added feature is the new and simple way of converting audio to MIDI using three different functions. “Convert harmony to new MIDI track”, located in the create drop down menu, will attempt to find the harmonic content of a piece of audio, such as chord voicing, and convert them into a MIDI track which can be used with any plug-in instrument. Further to this it is possible to extract melodic content using the “Convert melody to new MIDI track” and also “Convert drums to new MIDI track”. All this is done with a single click of the mouse. Perhaps the most successful of these three different options is the drum conversion. Ableton will separate the kick, snare and hats from your audio drum loop and magically put them in corresponding MIDI note paths. For other more complex parts such as toms and cymbals it will put the MIDI in an empty note path for you to edit yourself. Although these functions work easily enough, with a simple click of the mouse, and it’s easy to see the possibilities of this sort of audio to MIDI conversion, it still only works well if you are converting very simple audio clips.
As well as the audio to MIDI conversion there are some interesting and convenient new MIDI editing tools in the control section. You can highlight single note paths or the entire MIDI clip and reverse it or invert it, make it play at half time or double time, force the note lengths to play legato, duplicate the entire clip, or grab the note ranges and transpose them instantly by sliding your mouse up or down. You can also highlight areas of the MIDI clip and stretch or compress the timing of them. These quick manipulations are very much in line with the improvisational ethos that permeates the whole of the software and works very well indeed.
 There are some other handy improvements to assist with MIDI and audio editing in the form of new keyboard shortcuts, especially the quick toggle of draw mode, while there is also a simple way of consolidating material from the arrangement view back into session view which will be useful for people who are constantly tweaking their arrangements, or for those that wish to re-imagine their music in front of a live audience. Finally, it is now possible to create audio or MIDI tracks with default devices and racks already loaded by saving any particular channel as a default in the channel header. The next time you open up a new audio or MIDI channel then that default will appear in place of an empty audio or MIDI track.

Some of Ableton’s devices have had a shake up as well. Modulation in the Operator devices now has oscillator fixed frequency making it easier to get control of multiple oscillators in fixed mode at once. Multiband Dynamics has new side chaining possibilities and the Gate has a new display, side chain EQ and a return control for a smoother sound. The Compressor now allows you to toggle between three views making it especially useful for people new to sound engineering. One of the biggest additions is a new analogue style compressor, known as the Glue Compressor, which has control to limit the dynamic range that the compressor operates in with a dry/wet control that is useful for popular techniques such as parallel compression. EQ Eight now comes with the high quality setting as default, a button for turning on or off the spectral analysis of the frequencies you are working on and the capability to highlight multiple EQ points for simultaneous manipulation. Of most interest to those wishing to get their hands dirty with some basic programming, Max for Live is also now included in the suite package of Live 9, though the multitude of ready made, freely Max for Live devices such as the excellent Convolution Reverb make it a handy addition even for those who can’t get their heads around MFL’s workflow.
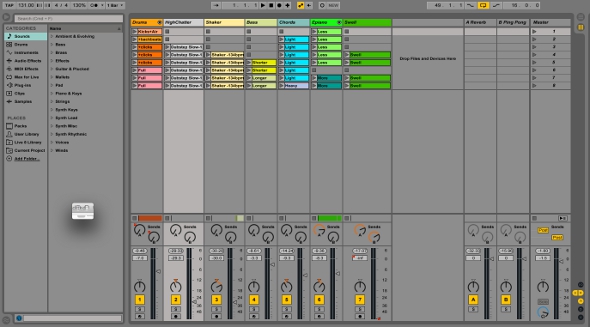
 Perhaps the most conspicuous change is in the browser section. It looks a lot smarter and tidier than before and its functionality has changed somewhat. There are two main headings in the form of “Categories”, such as sounds, clips, audio effects, plug-ins and so on that are grouped no matter where they live on your hard drive, and “Places” which allow you access to any location or folder on your hard drive you wish to add. Having them grouped this way makes it easier to find what you are looking for and further helps improve the speed of the work flow.
If there is a criticism to be levelled at Live 9, it could be that in their race to get a wonderfully efficient work flow they have taken some short cuts and slightly dumbed down the creative process – the audio to MIDI conversion is a prime example of this. It’s very easy to work in a vertical manner, layering loops on top of one another in a very one dimensional way because the results are instantaneous. Ableton’s updates have also been quite slow to come through – the last major update to Live was four years ago. Ableton have been criticised in the past for offering only incremental updates on an almost yearly basis, but in the case of Live 9 four years is an exceptionally long time for a full version update. Although the upgraded features are welcome, they are incremental in nature rather than providing a significant overhaul of Live 8. and to this writer doesn’t quite feel as though it’s been worth the four year wait. The clip automation in session view is a nice feature but it further encourages a vertical way of creating loop based music. The improved browser and automation editing are nice but again, they aren’t earth shattering changes – the same goes for the improvements in Ableton’s devices.
 Most people agree that what Ableton Live lacks in terms of mix ability it makes up for in work flow and flexibility, making it fully possible to create improvised works from scratch with a minimal amount of preparation. If you are part of a band that wants to use backing tracks and still be able to change things up on the fly then Live 9 is still the best solution to that particular problem, while it still offers DJs that extra level of creativity for their sets. However, whatever your needs are, and despite the incremental upgrades, Live 9 remains unique as a software tool for those who want to pursue their musical creativity in a streamlined, intuitive manner.
Rob Lee
Buy Live 9 Suite from Juno
Buy Live 9 Standard from Juno
Buy Live 9 Intro from Juno
Specifications:
| Bit Rate (Highest) | USB bus power |
| Sample Rate (Highest) | 16 backlit rubber pads, 16 knobs, 1 encoder, 2 touch sensitive jog wheels (with dual zones), 5 faders, 1 crossfader |
| Size (GB) | Stereo RCA, 1 1/4″ headphone, 1 1/8″ headphone |
| System Requirements PC | 1 1/4″ mic input (with level gain) |
| System Requirements Mac | 26.5cms x 46.5cms x 5 cms |